
Ever found yourself stranded on the side of the road, battling a dead headlight or a malfunctioning radio, only to be met with the daunting task of deciphering a seemingly cryptic fuse box diagram? The 2011 Honda CR-V, like many vehicles, relies on a complex network of fuses – tiny warriors protecting your car’s electrical components from overloads and short circuits. Yet, understanding the layout and function of these fuses can be the difference between frustration and a quick fix. This guide serves as your roadmap to conquering the mysteries of the 2011 CR-V’s fuse box, empowering you to tackle those electrical hiccups with confidence.

Image: wiringfixmichel.z13.web.core.windows.net
Understanding the 2011 Honda CR-V fuse box is a valuable skill, particularly for DIY enthusiasts and those who prioritize automotive self-reliance. It allows you to quickly identify and replace blown fuses, eliminating the need for costly trips to the mechanic. Plus, having a clear grasp of the fuse box’s layout can prevent serious electrical damage by ensuring that the correct fuses are used for each circuit.
Navigating the 2011 Honda CR-V Fuse Box: Two Locations, Two Functions
The 2011 Honda CR-V incorporates two fuse boxes, each strategically placed to safeguard different electrical systems. Understanding their locations and the circuits they control is crucial for successful troubleshooting.
1. Under the Hood: The Powerhouse of Electrical Protection
Open the hood of your CR-V and you’ll spot the first fuse box, conveniently located near the battery on the driver’s side. This is the heart of your car’s electrical protection, housing fuses for a wide array of vital systems:
- Engine Management: From the ignition system to the fuel injectors, the engine runs smoothly thanks to the protection offered by this fuse box.
- Lighting: Headlights, taillights, and brake lights are all safeguarded by fuses in this box, ensuring safe and visible driving conditions.
- Safety Systems: The airbags, anti-lock brakes, and other safety features are also secured by fuses in this location.
- Accessory Power: Power outlets, auxiliary lighting, and other helpful accessories draw from fuses within this box.
2. Inside the Cabin: The Dashboard Fuse Box
The second fuse box resides within the passenger cabin. To access it, you’ll need to pull the lower trim panel on the driver’s side of the dashboard. This box focuses on the electrical components associated with convenience features and infotainment systems within the cabin:
- Audio System: From radio to speakers to the CD player, this fuse box keeps your entertainment options running smoothly.
- Climate Control: The heater, air conditioner, and fan rely on the proper function of fuses in this box to maintain optimal comfort.
- Power Windows: Whether you’re rolling the windows down for a refreshing breeze or up for a bit of privacy, these fuses ensure these features operate seamlessly.
- Additional Interior Features: Other convenience features like power mirrors, power seats, and the sunroof all draw on fuses within this cabin-based box.
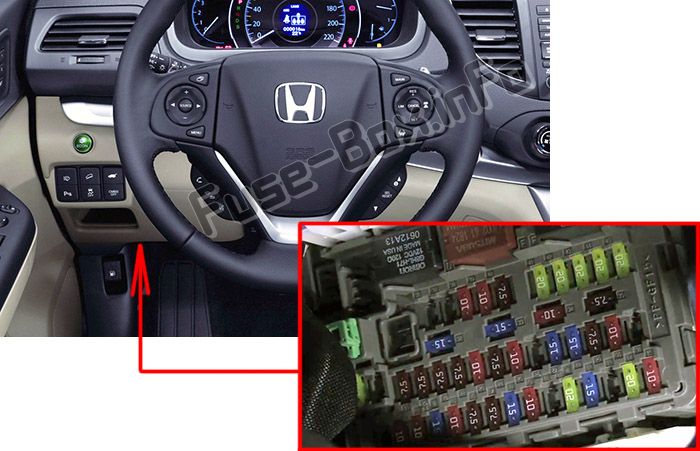
Image: machinepremixing.z13.web.core.windows.net
Deciphering the Fuse Box Diagram: The Key to Successful Troubleshooting
The fuse box diagram, often found inside the lid of each fuse box or in your owner’s manual, serves as your guide for navigating the intricate world of fuses. It’s a visual map detailing the location and function of each fuse, enabling you to quickly identify the specific fuse responsible for any electrical issue you might encounter.
Understanding the Diagram’s Key Elements:
- Fuse Numbers: These numbers align with the fuse positions within the box, allowing you to easily locate the correct fuse.
- Amperage Rating: Each fuse has a designated amperage rating, representing the maximum amount of electrical current it can safely handle. Always replace a blown fuse with one of the same amperage. Using a fuse with a higher amperage could lead to electrical damage and even fire hazards.
- Circuit Identification: The diagram clearly indicates the electrical components or systems protected by each fuse, making troubleshooting a breeze.
Troubleshooting Electrical Issues: A Step-by-Step Guide
When faced with an electrical malfunction in your 2011 Honda CR-V, don’t panic! Follow these steps to effectively troubleshoot the issue using the fuse box diagram:
- Identify the Symptom: Determine the exact electrical component or system experiencing difficulties. Is it a headlight, radio, power window, or something else?
- Consult the Fuse Box Diagram: Locate the diagram and find the fuse corresponding to the malfunctioning component or system. Write down the fuse number and amperage for easy reference.
- Inspect the Fuse: Use a flashlight to carefully check the fuse for any signs of breakage or melting. If you see any damage, it’s likely blown. If not, you’ll need to move on to other possible causes.
- Replace the Blown Fuse: If you’ve confirmed that the fuse is blown, carefully remove it. Next, locate a spare fuse with the same amperage rating from your vehicle’s fuse kit or a reputable auto parts store. Insert the new fuse into its designated slot.
- Test the Circuit: Turn on the component or system that was malfunctioning. If the issue is resolved, you’ve successfully replaced the blown fuse! If the problem persists, you may have a more complex electrical issue requiring further diagnosis.
Beyond Replacing Fuses: Addressing Underlying Electrical Problems
While replacing a blown fuse can often resolve a temporary electrical issue, it’s essential to understand that replacing a fuse is merely a symptom fix. The root cause of the blown fuse may lie deeper within your car’s electrical system.
Consider these common reasons for blown fuses:
- Short Circuit: A short circuit occurs when an unintended path for electrical current is created—think of it as a shortcut within the wiring system, leading to excessive current flow and fuse overload. Identifying and repairing the short circuit is crucial to prevent further fuse damage.
- Faulty Electrical Component: A defective headlight bulb, a malfunctioning power window motor, or even a damaged radio can cause a surge in electrical current, leading to a blown fuse. Replacing the malfunctioning component can often prevent repeated fuse failures.
- Corrosion or Loose Connections: Over time, corrosion or loose connections in wiring can create resistance, causing excessive heat and ultimately leading to a blown fuse. Inspecting and cleaning connections, or even replacing corroded wiring, can prevent future issues.
Keep in mind that if you suspect a more complex electrical problem, it’s always best to consult a qualified mechanic for a professional diagnosis and repair. They have the expertise and specialized tools to pinpoint and resolve the underlying cause of your electrical troubles.
Safety First: Essential Tips for Working with Fuses
Working with fuses can be empowering, but it’s crucial to prioritize safety to avoid injury or potential electrical damage:
- Disconnect the Battery: Before working with any electrical components, including fuses, always disconnect the battery’s negative (-) terminal to prevent electrical shocks.
- Wear Protective Gear: Using insulated gloves and safety goggles can significantly reduce the risk of electrical shocks or eye injuries.
- Use the Correct Tools: Utilize the appropriate fuse puller tool for safely removing and installing fuses. Never use metal objects to manipulate fuses, as this can cause damage or increase the risk of electrical shock.
2011 Honda Cr V Fuse Box Diagram
Conclusion: Empowering Yourself with Fuse Box Knowledge
The 2011 Honda CR-V fuse box diagram might seem daunting at first glance, but with this guide, you’re now equipped with the knowledge to decipher its secrets. Armed with this newfound understanding, you can confidently tackle electrical issues, preventing costly trips to the mechanic and empowering yourself to take control of your car’s electrical health. Remember, safety is paramount, and if you encounter any persistent issues or feel unsure about any aspect of electrical troubleshooting, always consult a qualified mechanic. With a little know-how and a dash of confidence, you’ll be well on your way to conquering those electrical hiccups and enjoying a smoother driving experience with your Honda CR-V.


