
Have you ever been cruising down the highway in your 2007 Nissan Murano, enjoying the open road and the wind in your hair, only to have your radio suddenly go silent? Or worse, your headlights flicker and die, plunging you into darkness? These electrical gremlins can be frustrating, but they don’t have to leave you stranded. The key to unlocking the solution lies within a small box, often hidden away under the dashboard – the fuse box. This is the command center for your Murano’s electrical system, and understanding its wiring diagram can empower you to be your own electrical detective.

Image: partsdiagram.netlify.app
The 2007 Nissan Murano fuse box diagram is more than just a jumble of lines and numbers. It’s a roadmap to your car’s electrical system, guiding you to the source of any electrical malfunctions. Whether you’re a seasoned mechanic or a curious car owner, this article will equip you with the knowledge to navigate the fuse box diagram and tackle electrical issues with confidence.
Unveiling the Mysteries of the 2007 Nissan Murano Fuse Box Diagram
The fuse box diagram for a 2007 Nissan Murano is a vital tool, like a treasure map guiding you through the car’s electrical network. It details the location of each fuse, its amperage rating, and the specific electrical components it protects.
Deciphering the Fuse Box Diagram: A Visual Voyage
The 2007 Nissan Murano has two primary fuse boxes: one located under the hood (engine compartment fuse box) and another within the cabin (passenger compartment fuse box). Each box has its own diagram, meticulously mapping out the fuse arrangement and providing essential information.
-
Location is key: Both diagrams clearly illustrate the physical location of the fuse boxes – a vital first step in embarking on your electrical troubleshooting journey.
-
Fuse identification: The diagram identifies each fuse by its number and amperage rating. This is crucial for determining the appropriate replacement fuse if a blown fuse is discovered.
-
Circuit clarity: The diagram clearly outlines which electrical circuit each fuse protects. Whether it’s the headlights, power windows, or audio system, the diagram illuminates the connection between the fuse and the component it safeguards.
-
Legend for understanding: The diagrams usually include a legend explaining the symbols used, simplifying the interpretation of the lines and icons.
Navigating the Diagram with Ease
Understanding the 2007 Nissan Murano fuse box diagram doesn’t require a degree in electrical engineering. It’s simpler than you think.
-
Visualize the layout: The diagram provides a clear visual representation of the fuse box, making it easy to locate the specific fuse you’re looking for.
-
Follow the circuit: Trace the line connecting the fuse to the component it protects to pinpoint the exact electrical circuit.
-
Check the amperage: Always use a fuse with the same amperage rating as the original fuse to ensure proper protection. Replacing a blown fuse with one of a higher amperage rating can lead to wiring damage or even a fire hazard.
-
Consult the owner’s manual: Your Murano’s owner’s manual contains valuable information regarding fuse locations and diagrams, supplementing your understanding of the electrical system.
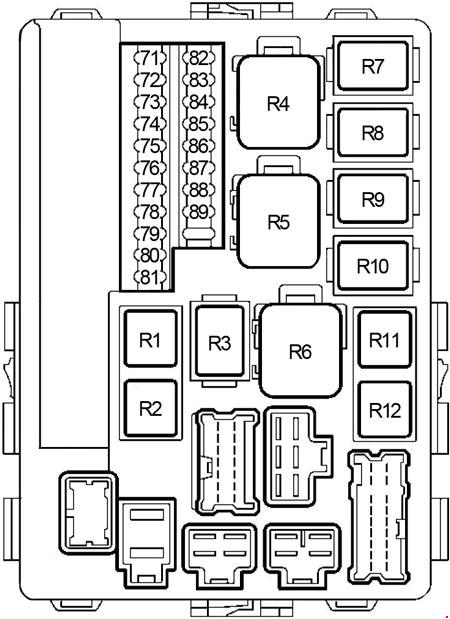
Image: sicherungskasten-auto.com
Troubleshooting Electrical Issues with Confidence
Armed with the 2007 Nissan Murano fuse box diagram, you’re ready to tackle those pesky electrical problems head-on.
Identifying Blown Fuses
Fuses are designed to protect electrical circuits from overload, acting as a sacrificial element to prevent damage. A blown fuse will appear visually burnt or broken.
-
Visual inspection: Check each fuse in the box, looking for any signs of damage.
-
Fuse tester: A simple fuse tester can quickly identify a blown fuse.
-
Replacement: If you find a blown fuse, replace it with a fuse of the same amperage rating.
Troubleshooting Steps
Once you’ve identified a blown fuse, there are a few troubleshooting steps to determine the underlying cause:
-
Isolate the component: If you’ve identified the fuse protecting a specific component (like the headlights or power windows), disconnect that component to see if the fuse blows again. If it does, you’ve isolated the problem to that component.
-
Inspect wiring: Check for any damaged or frayed wiring in the circuit.
-
Check for shorts: A short circuit can occur when wires touch, creating an unintended path for electricity. This can be caused by frayed wiring, a loose connection, or even corrosion.
-
Consult a mechanic: If you’re unsure about the cause of the blown fuse or if you’re unable to identify and fix the underlying issue, it’s best to consult a qualified automotive mechanic for assistance.
Expert Insights for Optimal Results
-
Utilize online resources: Numerous websites offer comprehensive 2007 Nissan Murano fuse box diagrams and troubleshooting guides.
-
DIY with caution: While understanding the fuse box diagram can empower you to address electrical issues yourself, remember to exercise caution when working with electrical systems.
-
Preventative maintenance: Regularly inspecting your fuse box and checking fuses can help prevent electrical problems from escalating.
-
Seek professional help: Don’t hesitate to contact a qualified automotive mechanic if you’re unsure about any aspect of electrical troubleshooting.
2007 Nissan Murano Fuse Box Diagram
Conclusion: Empowering You with Electrical Expertise
The 2007 Nissan Murano fuse box diagram is your roadmap to understanding and conquering electrical issues. It’s a resource that can empower you to troubleshoot problems with confidence and maintain your vehicle’s electrical system in top condition. Remember, familiarity with the diagram is your key to avoiding electrical gremlins and ensuring a smooth, reliable driving experience. So, take the time to study the diagram, understand its intricacies, and you’ll be ready to tackle any electrical challenge that comes your way.


